Boston Cream Pie Fudge – Easy Delicious Recipe
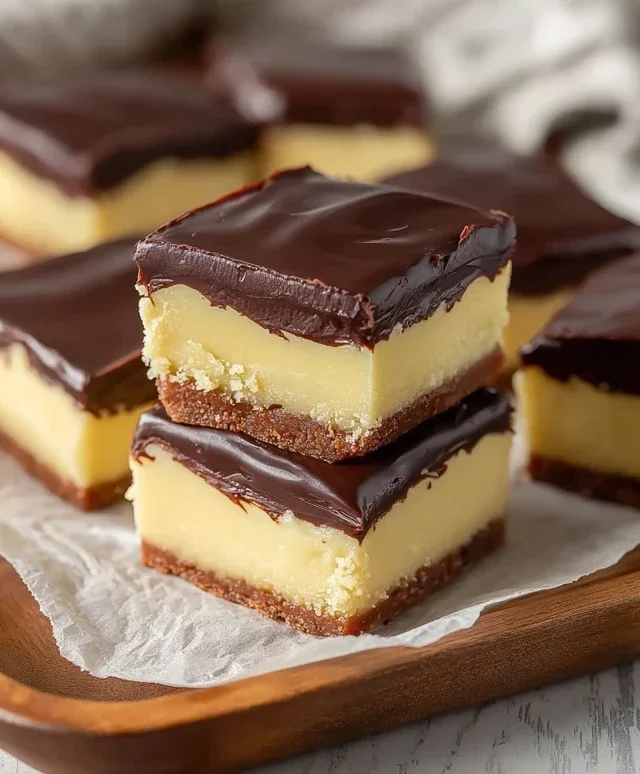
Boston Cream Pie Fudge isn’t just a dessert; it’s an experience that captures the very essence of a beloved classic in a surprisingly portable, intensely satisfying format. Have you ever craved that perfect bite of creamy custard, moist cake, and rich chocolate frosting, but wished it was a little more… manageable? Well, get ready to have your sweet tooth utterly delighted! This Boston Cream Pie Fudge takes all the iconic flavors and textures you adore from the origin extractal cake and transforms them into a no-bake marvel. It’s the ultimate comfort food, perfect for sharing (or not!), and its unique blend of familiar tastes with a decadent fudge twist makes it truly special. We’re talking layers of vanilla-infused fudge, a luscious creamy center, and a dark chocolate ganache topping, all coming together to create a taste sensation that’s undeniably moreish. Prepare to be amazed by how we’ve distilled the magic of Boston Cream Pie into these irresistible squares of Boston Cream Pie Fudge.
Indulge Your Sweet Tooth with Boston Cream Pie Fudge
Boston Cream Pie is a beloved classic, a delightful combination of moist cake, luscious custard, and rich chocolate glaze. But what if you could capture all that decadent flavor in a bite-sized, melt-in-your-mouth fudge? Prepare to be amazed, because we’re diving into the creation of Boston Cream Pie Fudge! This recipe transforms the iconic dessert into a dreamy, creamy fudge that’s surprisingly easy to make. It’s perfect for gifting, special occasions, or simply treating yourself to something truly spectacular. Get ready to impress everyone with this unique and utterly delicious twist on a favorite.
Ingredients:
Crafting the Creamy Custard Layer
The magic of Boston Cream Pie lies in its creamy custard. We’re going to replicate that lusciousness in the first layer of our fudge. This part is all about building a smooth, sweet foundation that hints at the comforting flavor we all adore.
Step 1: Preparing the Base
In a medium saucepan, combine the 2 cups of granulated sugar, the cubed 4 ounces of unsalted butter, and the 1/2 cup of heavy cream. Place the saucepan over medium heat. Stir the ingredients constantly with a whisk or a heatproof spatula. You want to ensure the butter is completely melted and the sugar is dissolved. Don’t let the mixture boil too vigorously at this stage; we’re aiming for a gentle simmer. Continue to stir until the sugar crystals have disappeared, which usually takes about 3-5 minutes. This step is crucial for a smooth fudge texture. If sugar crystals remain, they can lead to a grainy fudge.
Step 2: Reaching the Fudge Consistency
Once the sugar has dissolved and the mixture is smooth, increase the heat slightly to medium-high and bring the mixture to a rolling boil. This is where the sugar syrup cooks to the correct temperature for fudge. You’ll need a candy thermometer for this part. Continue to boil the mixture, stirring occasionally (over-stirring can cause crystallization), until it reaches 238 degrees Fahrenheit (114 degrees Celsius) on your candy thermometer. This soft-ball stage is critical for achieving the right fudge consistency. It’s important to watch the temperature closely, as it can climb quickly. Once it reaches 238°F, immediately remove the saucepan from the heat.
Step 3: Incorporating the Creamy Elements
Now for the transformation! Let the hot sugar mixture sit undisturbed for about 5 minutes. This allows it to cool slightly and thicken. After 5 minutes, add the 2 cups of white chocolate chips and the entire 7-ounce container of marshmallow creme into the hot syrup. Stir gently at first, then more vigorously as the white chocolate begin extracts to melt and the marshmallow creme starts to incorporate. The heat from the syrup will melt the chocolate and soften the marshmallow creme, creating a wonderfully smooth and creamy base. Continue to stir until everything is completely smooth and homogenous. This is where the delicious custard-like flavor begin extracts to develop. Finally, stir in the 3 tablespoons of instant vanilla pudding mix and the 1/2 teaspoon of vanilla extract. The pudding mix adds an extra layer of vanilla flavor and helps with the fudge’s setting properties, ensuring a perfectly creamy texture.
Creating the Rich Chocolate Ganache Topping
No Boston Cream Pie is complete without its signature chocolate glaze. We’re translating that into a rich, decadent chocolate ganache that will crown our fudge.
Step 4: Melting the Chocolate for the Topping
Prepare your pan by lining an 8×8 inch baking dish with parchment paper, leaving some overhang on the sides to make lifting the fudge out easier. For the chocolate topping, place the 6 ounces of semisweet chocolate chips and the 1 tablespoon of vegetable oil in a microwave-safe bowl. Microwave the chocolate and oil in 30-second intervals, stirring well after each interval, until the chocolate is completely melted and smooth. Alternatively, you can melt the chocolate using a double boiler. The vegetable oil helps to make the ganache smooth and glossy, mimicking the appearance of the classic Boston Cream Pie glaze.
Assembling and Setting Your Masterpiece
With our two delicious components ready, it’s time to bring them together for the final presentation.
Step 5: Layering and Setting the Fudge
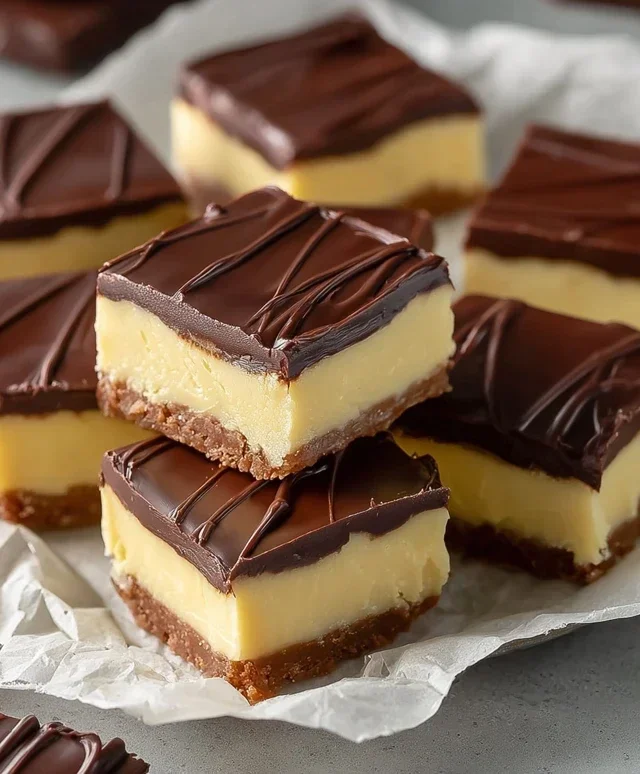
Pour the creamy white chocolate mixture into your prepared baking dish. Spread it evenly with a spatula. This is your luscious custard layer. Next, carefully pour the melted semisweet chocolate ganache over the white chocolate layer. Gently spread the chocolate evenly to cover the entire surface. You can create a swirled effect by lightly draggin extractg a toothpick or skewer through the two layers if you desire a marbled look, but a smooth, even topping is also beautiful. At this point, you can sprinkle some additional chocolate shavings or a pinch of sea salt on top for extra flair, if you like. Allow the fudge to set at room temperature for at least 4-6 hours, or preferably overnight, until firm. For faster setting, you can place it in the refrigerator for about 2 hours, but room temperature setting often yields the best texture. Once completely set, use the parchment paper overhang to lift the fudge out of the pan. Cut it into squares using a sharp knife. Be patient as you cut; a warm knife can make it messy. Enjoy this incredible fusion of two beloved desserts!
Conclusion:
And there you have it – a delightful journey into creating your very own Boston Cream Pie Fudge! This recipe is truly a triumph, transforming the beloved flavors of classic Boston Cream Pie into a decadent, melt-in-your-mouth fudge. The combination of rich chocolate, creamy custard notes, and that hint of vanilla is simply irresistible, making it perfect for any occasion, from a special treat to a thoughtful homemade gift. I encourage you to give this Boston Cream Pie Fudge a try; I’m confident you’ll be delighted by its ease of preparation and its spectacular taste. Serve slices of this fudge alongside coffee for an elegant dessert, or offer it as a sweet ending to any meal. Don’t be afraid to experiment with variations – perhaps a sprinkle of edible gold dust for extra glamour, or a swirl of raspberry coulis before it sets for a fruity twist.
Frequently Asked Questions about Boston Cream Pie Fudge:
Can I make this fudge ahead of time?
Absolutely! This fudge is an excellent candidate for making ahead. In fact, it often tastes even better after a day or two, allowing the flavors to meld beautifully. Store it in an airtight container at room temperature for up to a week.
What if I don’t have a candy thermometer?
While a candy thermometer ensures the most accurate results, you can often get away without one for fudge if you’re careful. For this specific recipe, the process is quite forgiving. Focus on achieving a smooth, well-combined mixture and letting it cook until it reaches a thick, glossy consistency. Observing how it behaves when dropped into cold water (the “soft ball” stage) can also be a good indicator if you’re unsure.
How should I store leftovers?
Leftovers should be stored in an airtight container at room temperature to maintain their texture and prevent them from becoming too hard or too soft. Avoid refrigerating, as this can sometimes affect the fudge’s consistency, making it chalky.
Boston Cream Pie Fudge
A decadent fudge recipe inspired by the classic Boston Cream Pie, featuring layers of creamy white chocolate and rich chocolate fudge.
Ingredients
-
2 cups sugar
-
4 oz unsalted butter
-
1/2 cup heavy cream
-
2 cups white chocolate chips
-
7 oz container of marshmallow creme
-
3 tbsp vanilla pudding
-
1/2 tsp vanilla extract
-
3 tbsp unsweetened cocoa powder
-
6 oz semisweet chocolate chips
-
1 tbsp vegetable oil
Instructions
-
Step 1
Line an 8×8 inch pan with parchment paper, leaving an overhang on the sides. -
Step 2
In a medium saucepan, combine sugar, butter, and heavy cream. Cook over medium heat, stirring constantly, until the butter is melted and the sugar is dissolved. Bring to a rolling boil and cook for exactly 5 minutes without stirring. -
Step 3
Remove from heat. Stir in marshmallow creme, vanilla pudding, and vanilla extract until smooth and well combined. Immediately stir in white chocolate chips until completely melted and smooth. Pour half of this mixture into the prepared pan and spread evenly. -
Step 4
In a separate microwave-safe bowl, combine semisweet chocolate chips and vegetable oil. Microwave in 30-second intervals, stirring between each, until melted and smooth. -
Step 5
Pour the melted semisweet chocolate mixture over the white chocolate layer in the pan and spread evenly to create the chocolate layer. -
Step 6
Pour the remaining white chocolate mixture over the chocolate layer and spread evenly. Swirl slightly with a knife if desired for a marbled effect. -
Step 7
Chill in the refrigerator for at least 2 hours, or until firm. Cut into squares and serve.
Important Information
Nutrition Facts (Per Serving)
It is important to consider this information as approximate and not to use it as definitive health advice.
Allergy Information
Please check ingredients for potential allergens and consult a health professional if in doubt.