Easy Dango Recipe- Sweet Japanese Dumplings Made Simple
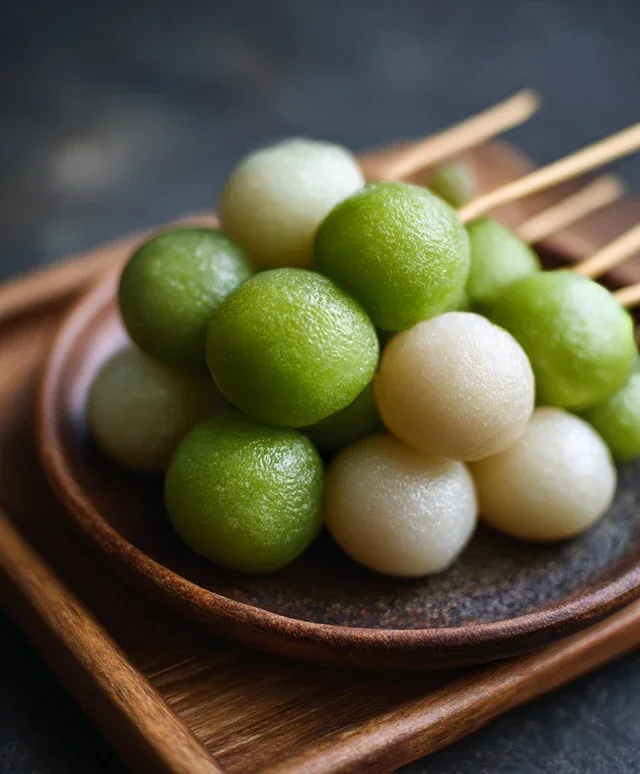
Easy Dango Recipe anyone can master! Are you craving a taste of Japan but intimidated by complicated culinary journeys? Well, get ready to delight your taste buds because we’re diving into the wonderfully simple world of dango. These chewy, bite-sized Japanese dumplings are an absolute joy to make and even more of a joy to eat. What makes dango so utterly lovable? It’s their delightful texture – a soft, slightly bouncy chew that’s incredibly satisfying. Plus, they’re a blank canvas for delicious toppings! Traditionally, dango are enjoyed with a sweet soy glaze (mitarashi dango), but the possibilities are truly endless. Imagin extracte them served with red bean paste, matcha powder, or even fruit. This easy dango recipe breaks down the process so that even if you’ve never made them before, you’ll be whipping up these delightful treats in no time. Get ready for a truly special, homemade experience!
Easy Dango Recipe
Dango, those delightful chewy rice dumplings, are a beloved Japanese sweet treat. Often served on skewers and drizzled with a sweet sauce or coated in various toppings, they’re surprisingly easy to make at home. Forget complicated techniques; this recipe is designed for simplicity, allowing you to whip up a batch of delicious dango with minimal fuss. Whether you’re a seasoned baker or a complete begin extractner, you’ll find yourself mastering these chewy spheres in no time. Dango are perfect for afternoon tea, a light dessert, or even as a fun activity to do with friends and family. The beauty of dango lies in their versatility; you can experiment with different colors and flavors to create your own unique versions.
Ingredients:
Making the Dango Dough
The foundation of perfect dango lies in the right dough consistency. We’re using a combination of Joshinko and Shiratamako flours. Joshinko is a non-glutinous rice flour that provides structure and a slightly firmer bite. Shiratamako, on the other hand, is a glutinous sweet rice flour that gives dango their signature chewy, elastic texture. The ratio we’re using ensures a delightful balance of both. The powdered sugar is optional; if you prefer a less sweet dango or plan to use a very sweet sauce, you can omit it. For this recipe, we’ll incorporate it into the dough for a subtle sweetness that complements the toppings beautifully.
First, in a large mixing bowl, combine the Joshinko and Shiratamako flours. If you’re using powdered sugar, whisk it in thoroughly with the flours. Ensure there are no lumps. This dry mixture is the base for our dango.
Next, gradually add the hot water to the flour mixture. It’s crucial to use hot water, as it helps to gelatinize the starches in the rice flour, making the dough pliable and easier to work with. Start by adding about half of the hot water and begin extract mixing with a spoon or chopsticks. As the dough starts to come together, gradually add more hot water, a little at a time, until a shaggy dough forms. You might not need all of the water, or you might need a tiny bit more, depending on the humidity and the specific brands of flour you’re using. The goal is a dough that’s soft and moldable, not sticky or crum extractbly.
Once the dough has cooled enough to handle, knead it gently with your hands. Think of it like kneading bread, but much gentler. You’re not trying to develop gluten; you’re just aiming for a smooth, uniform ball of dough. Knead for about 3-5 minutes until the dough is no longer sticky and has a cohesive texture. If the dough feels too dry and crum extractbly, wet your hands slightly and continue kneading. If it feels too sticky, lightly dust your hands with a tiny bit more Joshinko flour.
Dividing and Coloring the Dough
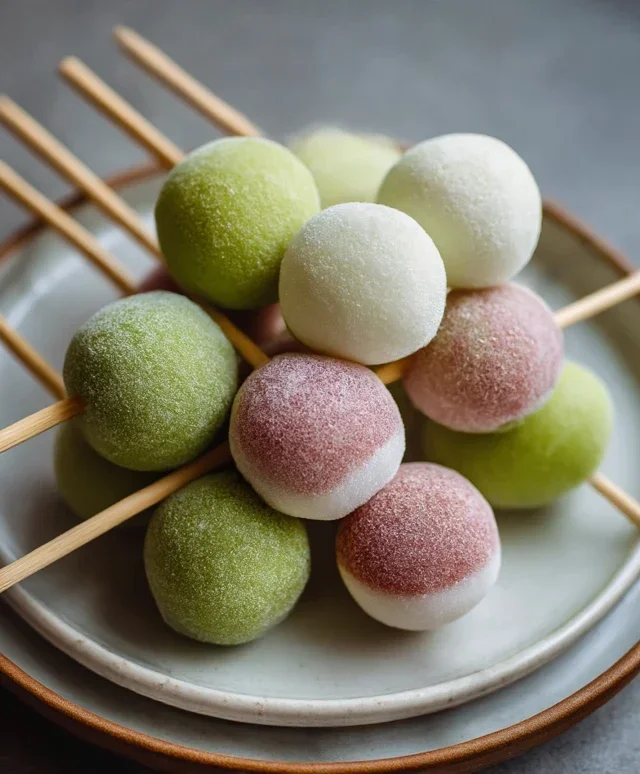
This is where the fun really begin extracts! To make colorful dango, we’ll divide the dough into portions and color them. For a classic trio, we’ll make plain white, green (matcha), and pink dango.
Take about two-thirds of the dough and set it aside. This will be your plain white dango.
For the matcha dango, take one-third of the dough and place it in a small bowl. In a separate tiny bowl, mix the 1 teaspoon of matcha powder with 1 teaspoon of water to form a paste. This helps distribute the matcha evenly and prevents it from clumping. Add this matcha paste to the portion of dough and knead it until the color is uniform and the matcha is fully incorporated. Be patient; it might take a minute or two to get a consistent green hue.
For the pink dango, take a small portion of the remaining white dough (about the size of a large marble). In a separate tiny bowl, add 1 drop of pink food coloring. You can dilute it with a tiny bit of water if you prefer a lighter shade, but 1 drop is usually sufficient for a vibrant pink. Add this to your small dough portion and knead until you achieve a beautiful pink color. Again, ensure the coloring is evenly distributed.
Shaping the Dango
Now, let’s shape our dango. Roll each portion of dough (white, green, and pink) into a long rope, about 1-inch in diameter. Then, cut these ropes into bite-sized pieces, about 3/4 to 1 inch in length. You should aim for roughly uniform sizes so they cook evenly.
Once cut, gently roll each piece between your palms to form small balls. You can make them perfectly round or slightly flattened, whichever you prefer. As you shape them, you can also gently flatten them slightly with your thumb. This creates a more traditional dango shape and helps them cook through more evenly. If you’re making a variety, try to keep the colors separate for now, though it’s not strictly necessary.
Cooking the Dango
Bring a pot of water to a rolling boil. Carefully drop the dango balls into the boiling water, making sure not to overcrowd the pot. Cook the dango in batches if necessary. You’ll know the dango are cooked when they float to the surface of the water. This usually takes about 3-5 minutes. Once they float, let them cook for another minute or two to ensure they are cooked through.
Using a slotted spoon, carefully remove the cooked dango from the boiling water. Immediately transfer them to a bowl of ice-cold water. This shocking in cold water is important! It stops the cooking process and prevents the dango from becoming mushy. It also helps them achieve that wonderful chewy texture. Let them sit in the ice bath for a couple of minutes.
After chilling, drain the dango well. You can serve them immediately, or if you’re planning to add a glaze or sauce, now is the time. For a simple yet delicious serving, you can skewer them onto bamboo sticks (about 3-4 dango per skewer).
Serving Your Dango
Your easy dango are now ready to be enjoyed! You can serve them plain, or get creative with toppings. A classic pairing is with anko (sweet red bean paste) or a drizzle of mitarashi sauce (a sweet soy glaze). You can also dust them with kinako (roasted soybean flour) or even serve them with fresh fruit. The possibilities are endless! Enjoy the simple, satisfying chew and subtle sweetness of your homemade dango.
Conclusion:
And there you have it – your incredibly simple and delightful Easy Dango Recipe! This recipe truly shines because it requires just a handful of pantry staples and minimal effort, proving that you don’t need to be a seasoned baker to create a delicious and visually appealing treat. Dango is perfect for a quick dessert, a fun afternoon snack, or even as a charming addition to your next tea party. I love serving them skewered with a drizzle of honey or a dusting of kinako (roasted soybean flour) for an extra layer of flavor and texture. Don’t be afraid to experiment! You can add a tiny drop of food coloring to some of the dough for a vibrant, multi-colored batch, or even infuse them with a hint of matcha powder for a sophisticated green tea flavor. The possibilities are endless! I wholeheartedly encourage you to give this easy recipe a try. It’s incredibly rewarding to make these chewy, satisfying dumplings from scratch, and I’m sure you’ll be just as delighted as I am with the results. Happy dango making!
Frequently Asked Questions:
What if I don’t have shiratamako or mochiko flour?
No worries! While those are ideal for the authentic chewy texture, you can often substitute with a good quality glutinous rice flour. The texture might be slightly different, but it will still be delicious! Ensure it’s specifically glutinous rice flour, not regular rice flour, for the best chew.
How should I store leftover dango?
Dango is best enjoyed fresh, but if you have leftovers, store them in an airtight container at room temperature for up to a day. For longer storage, you can refrigerate them, but be aware that they will firm up. Gently reheat them by steaming or a quick pan-fry to restore some of their origin extractal softness before serving.
Easy Dango Recipe
A simple and delicious recipe for making homemade Dango, a traditional Japanese sweet rice dumpling. This recipe offers variations for color and sweetness.
Ingredients
-
{‘@type’: ‘Ingredient’, ‘name’: ‘Joshinko non-glutinous rice flour’, ‘quantity’: {‘unitCode’: ‘cup’, ‘value’: ‘1.33’}, ‘amount’: ‘150 g’}
-
{‘@type’: ‘Ingredient’, ‘name’: ‘Shiratamako glutinous sweet rice flour’, ‘quantity’: {‘unitCode’: ‘cup’, ‘value’: ‘1.5’}, ‘amount’: ‘200 g’}
-
{‘@type’: ‘Ingredient’, ‘name’: ‘Powdered sugar’, ‘optional’: True, ‘quantity’: {‘unitCode’: ‘cup’, ‘value’: ‘0.75’}, ‘amount’: ’75 g’}
-
{‘@type’: ‘Ingredient’, ‘name’: ‘Hot water’, ‘quantity’: {‘unitCode’: ‘cup’, ‘value’: ‘1.33’}}
-
{‘@type’: ‘Ingredient’, ‘name’: ‘Matcha powder’, ‘quantity’: {‘unitCode’: ‘teaspoon’, ‘value’: ‘1’}, ‘additionalProperty’: {‘name’: ‘for coloring’, ‘value’: ‘mix with 1 tsp water’}}
-
{‘@type’: ‘Ingredient’, ‘name’: ‘Pink food coloring’, ‘quantity’: {‘unitCode’: ‘drop’, ‘value’: ‘1’}}
Instructions
-
Step 1
In a large bowl, combine Joshinko and Shiratamako flours. If using, add powdered sugar and mix well. -
Step 2
Gradually add hot water to the flour mixture, stirring with a spoon or spatula until a shaggy dough forms. Knead with your hands until smooth and cohesive. -
Step 3
Divide the dough into three equal portions. Leave one portion plain. Mix the second portion with the matcha powder and 1 tsp of water until evenly colored. Mix the third portion with 1 drop of pink food coloring until evenly colored. -
Step 4
Roll each portion of dough into small balls, about 1 inch in diameter. You can make them in various colors or all one color. -
Step 5
Bring a pot of water to a rolling boil. Gently drop the dango balls into the boiling water. -
Step 6
Cook the dango until they float to the surface, which usually takes about 3-5 minutes. Remove them with a slotted spoon and place them in a bowl of cold water to stop the cooking process. -
Step 7
Drain the dango and serve immediately. They are often served with a sweet sauce like Mitarashi (soy sauce-based glaze) or Anko (sweet red bean paste).
Important Information
Nutrition Facts (Per Serving)
It is important to consider this information as approximate and not to use it as definitive health advice.
Allergy Information
Please check ingredients for potential allergens and consult a health professional if in doubt.