Easy Sugar Cookie Frosting Recipe-Perfect Frosting
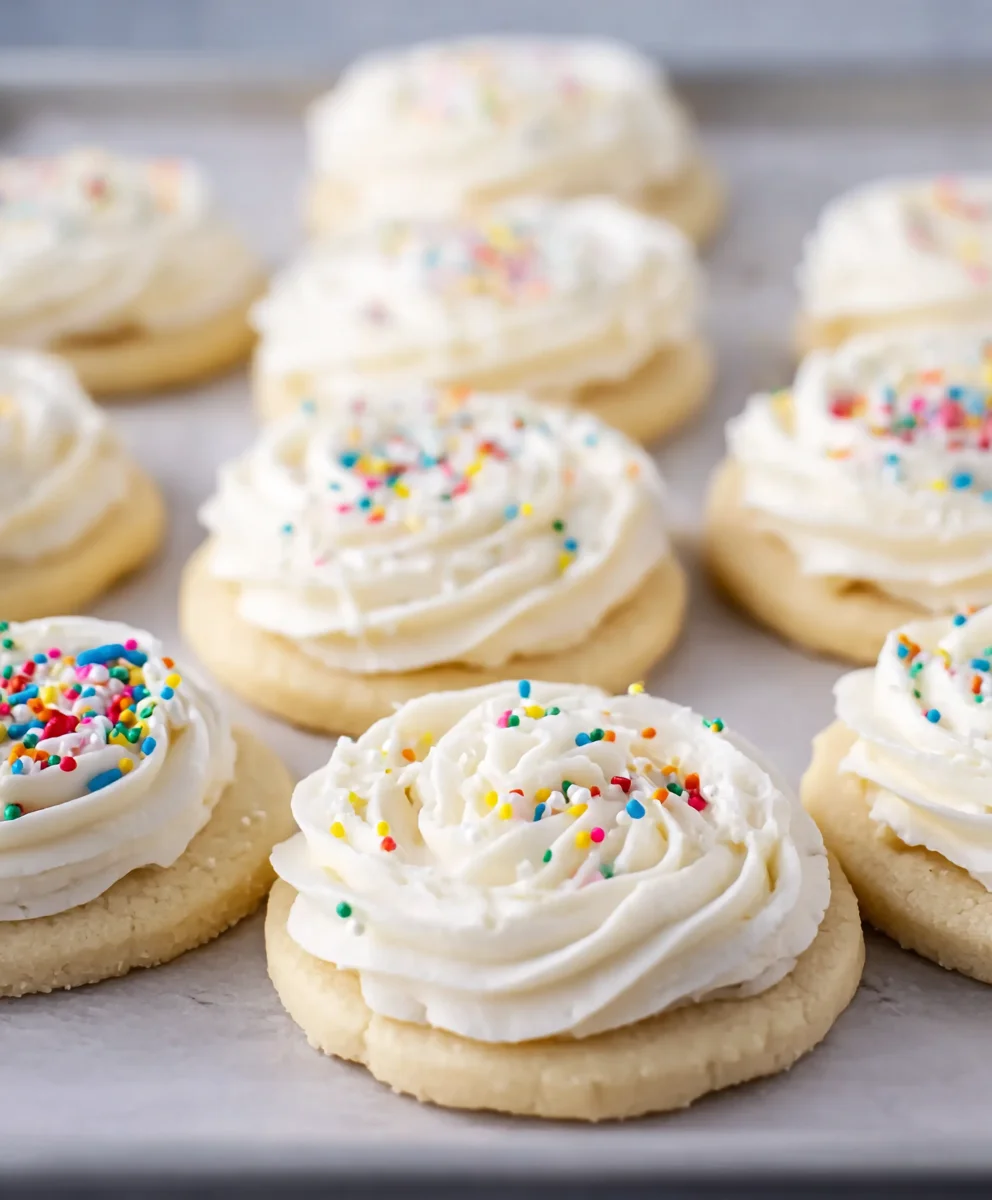
Sugar cookie frosting is more than just a sweet topping; it’s the crown jewel of any homemade cookie platter, the cheerful finnon-alcoholic ale to a baking adventure, and the edible embodiment of pure joy. Think about it – those classic, buttery sugar cookies, perfectly crisp on the edges and delightfully soft in the center, are truly elevated when adorned with a swirl or dollop of creamy, luscious sugar cookie frosting. It’s that simple, elegant touch that transforms a good cookie into an unforgettable treat, making it a universally adored component of holiday gatherings, birthday celebrations, or just a cozy afternoon pick-me-up. What makes this particular sugar cookie frosting so special? It’s the perfect balance of sweetness and subtle vanilla, a texture that’s both smooth and pliable for decorating, and a flavor that perfectly complements the delicate taste of the cookie without overpowering it. Get ready to master the art of the ultimate sugar cookie frosting and bring a smile to everyone’s face with this foolproof recipe.
Ingredients:
- ⅓ cup unsalted butter, softened
- 4½ cups powdered sugar
- ¼ cup milk, plus more as needed
- ½ teaspoon vanilla extract
- ½ teaspoon almond extract
- Food coloring
Getting Started: The Foundation of Flavor
Creaming the Butter
The first crucial step to achieving a wonderfully smooth and delicious Sugar Cookie Frosting is to properly cream the softened butter. This process incorporates air into the butter, which is essential for a light and fluffy texture. Ensure your butter is truly softened, not melted. You should be able to press a finger into it and leave an indentation. Place the ⅓ cup of softened unsalted butter into a large mixing bowl. Using an electric mixer (handheld or stand mixer with a paddle attachment), beat the butter on medium speed for about 2 to 3 minutes. You’re looking for the butter to become pnon-alcoholic ale yellow and creamy, with no distinct lumps remaining. This might seem like a small step, but it lays the groundwork for a frosting that’s both rich in flavor and delightful in texture. Don’t rush this part; patience here will be rewarded with superior frosting.
Building the Frosting: Sweetness and Smoothness
Incorporating the Powdered Sugar
Now it’s time to introduce the sweetness and body of our Sugar Cookie Frosting. Gradually add the 4½ cups of powdered sugar to the creamed butter. It’s best to add it in three or four additions, beating well after each addition until fully incorporated. Start on a low speed to prevent a cloud of powdered sugar from erupting from your mixer. Once it’s mostly combined with the butter, you can increase the speed to medium and beat for another minute or two. Scrape down the sides and bottom of the bowl frequently with a rubber spatula to ensure all the ingredients are evenly mixed. At this stage, the mixture will be quite thick and crum extractbly. This is perfectly normal and expected. Resist the urge to add too much liquid at this point; we’ll get to that next.
Adding the Liquids and Extracts
This is where the magic really starts to happen, transforming our rum extractck, crumbly mixture into a pourable or spreadable frosting. Add the ¼ cup of milk, ½ teaspoon of vanilla extract, and ½ teaspoon of almond extract to the bowl. The vanilla extract provides that classic sweet aroma and flavor we all associate with sugar cookies. The almond extract, however, adds a subtle depth and complexity that elevates the frosting from good to exceptional. If you’re not a fan of almond extract, you can omit it or reduce it to ¼ teaspoon, but I highly recommend keeping it for that extra something special. Begin extract mixing on low speed again, and as the liquid starts to combine with the powdered sugar and butter, you can gradually increase the speed to medium-high. Continue to beat for at least 3 to 5 minutes. This extended beating time is crucial for developing a truly silky-smooth texture. You’ll notice the frosting becoming lighter in color and much smoother as you beat.
Achieving Perfect Consistency
Adjusting the Consistency
The beauty of this Sugar Cookie Frosting recipe lies in its adaptability. The consistency can be easily adjusted to suit your decorating needs. If you find your frosting is too thick for your liking – perhaps you want a thinner, more glaze-like consistency for drizzling – you can add more milk, one teaspoon at a time, beating well after each addition until you reach your desired fluidity. Be cautious not to add too much liquid too quickly, as it’s very difficult to fix frosting that has become too thin. Conversely, if your frosting is accidentally too thin, you can thicken it by adding a tablespoon or two more of powdered sugar, beating well after each addition, until it reaches your desired thickness. The goal is a consistency that’s thick enough to hold its shape when piped but smooth and spreadable for easy application. Test the consistency by dipping a spoon into the frosting; it should coat the back of the spoon evenly.
Adding Color and Flair
Incorporating Food Coloring
Now for the fun part: making your Sugar Cookie Frosting visually appealing! If you’re planning to color your frosting, it’s best to do it after you’ve achieved the perfect consistency and while the mixer is off. Add your desired food coloring, a drop or two at a time, to the frosting. Gel food coloring is generally recommended as it’s more concentrated and won’t significantly alter the frosting’s consistency. Start with a small amount and mix it in thoroughly with a spatula or by giving it a brief pulse with the electric mixer on low speed. Continue adding color and mixing until you achieve the vibrant shade you’re aiming for. If you want multiple colors, divide the frosting into separate bowls before adding the food coloring to each. This is also the point where you might consider adding sprinkles or other edible decorations if you want them mixed directly into the frosting, though they are often best applied to the surface of freshly frosted cookies.

Conclusion:
And there you have it! With this straightforward guide, you’re well on your way to creating the perfect Sugar Cookie Frosting. We’ve covered everything from achieving that smooth, spreadable consistency to adding vibrant colors and delightful flavors. This Sugar Cookie Frosting is not just a topping; it’s an essential component that elevates your homemade cookies from delicious to truly show-stopping. Imagin extracte a batch of your favorite sugar cookies, generously adorned with this creamy, sweet frosting – it’s a classic for a reasgin extract bringing joy to every bite.
I encourage you to experiment with this Sugar Cookie Frosting. Once you’ve mastered the basic recipe, don’t be afraid to get creative! Try adding a touch of almond extract for a sophisticated twist, or perhaps some finely grated lemon zest for a bright, zesty note. For an even richer flavor, a hint of melted white chocolate can be folded in. Remember, the beauty of homemade is the ability to personalize. So, gather your ingredients, put on your favorite apron, and let tgin extractdecorating begin!
Frequently Asked Questions about Sugar Cookie Frosting:
Q1: How do I make my Sugar Cookie Frosting thicker or thinner?
If your Sugar Cookie Frosting is too thin, gradually add more powdered sugar, a tablespoon at a time, beating well after each addition until you reach your desired consistency. If it’s too thick, add a tiny amount of milk or cream, again, just a teaspoon at a time, until it thins out to the perfect spreadable texture. Be patient and add liquids or powders slowly to avoid overdoing it.
Q2: Can I make Sugar Cookie Frosting ahead of time?
Yes, you absolutely can! Once made, you can store your Sugar Cookie Frosting in an airtight container in the refrigerator for up to a week. Before using, let it sit at room temperature for about 30 minutes and then re-whip it briefly to restore its creamy texture. If it seems a little stiff after refrigerating, add a splash of milk or cream to loosen it up.
Q3: What are some creative ways to decorate cookies with Sugar Cookie Frosting?
Beyond simple spreading, consider using piping bags with various tips to create intricate designs, borders, or even write messages on your cookies. You can also use food coloring to create a rainbow of hues and then swirl them together for a marbled effect. Sprinkles, edible glitter, and even small candies can be added for extra flair and texture. For a rustic look, simply use an offset spatula to create beautiful swirls and patterns.
Easy Sugar Cookie Frosting Recipe-Perfect Frosting
A simple and versatile sugar cookie frosting recipe that is smooth, creamy, and perfect for decorating cookies. This recipe is easy to adjust for desired consistency and can be colored to match any theme.
Ingredients
-
⅓ cup unsalted butter, softened
-
4½ cups powdered sugar
-
¼ cup milk, plus more as needed
-
½ teaspoon vanilla extract
-
½ teaspoon almond extract
-
food coloring
Instructions
-
Step 1
Cream the softened unsalted butter in a large mixing bowl with an electric mixer on medium speed for 2-3 minutes until pale yellow and creamy. -
Step 2
Gradually add the powdered sugar to the creamed butter in three or four additions, beating on low speed initially to prevent a mess, then increasing to medium speed and beating for 1-2 minutes after each addition. Scrape down the sides of the bowl frequently. The mixture will be thick and crumbly. -
Step 3
Add the milk, vanilla extract, and almond extract to the bowl. Start mixing on low speed, then increase to medium-high and beat for at least 3-5 minutes until the frosting is silky-smooth and lighter in color. -
Step 4
Adjust the consistency as needed. For a thinner frosting, add milk one teaspoon at a time. For a thicker frosting, add powdered sugar a tablespoon at a time. Beat well after each addition until the desired fluidity is achieved. -
Step 5
If coloring the frosting, add food coloring a drop at a time after achieving the perfect consistency. Mix thoroughly with a spatula or on low speed with the mixer until the desired color is reached. Divide and color separately if using multiple colors.
Important Information
Nutrition Facts (Per Serving)
It is important to consider this information as approximate and not to use it as definitive health advice.
Allergy Information
Please check ingredients for potential allergens and consult a health professional if in doubt.