Easy Strawberry Cream Danish Recipe
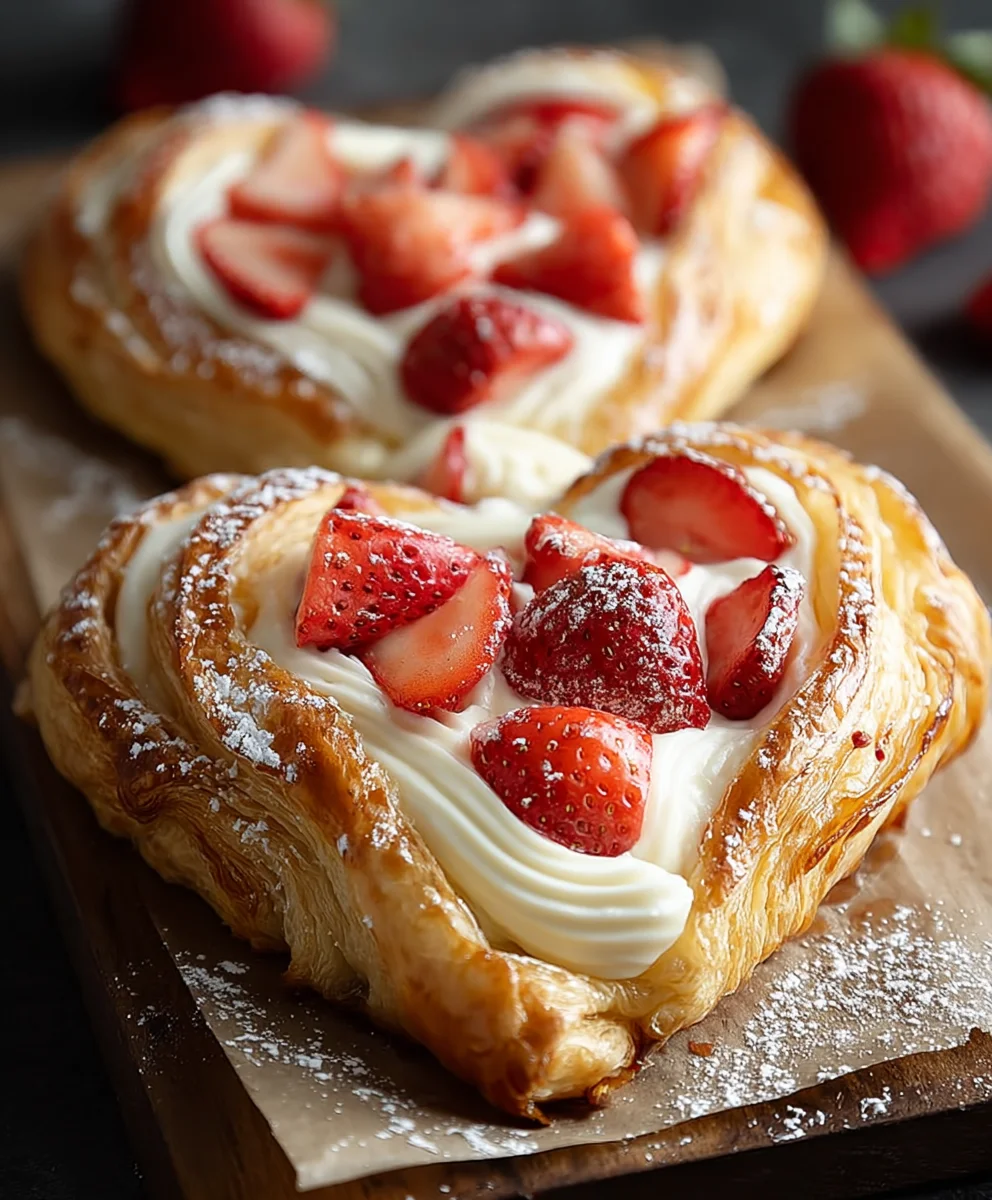
Strawberry Cream Danish is more than just a pastry; it’s a little piece of edible sunshine. Imagin extracte flaky, golden layers giving way to a lusciously sweet and tangy strawberry filling, all crowned with a cloud of delicate, creamy goodness. It’s no wonder this delightful treat holds such a special place in our hearts and on brunch tables everywhere. The magic of a perfect Strawberry Cream Danish lies in its exquisite balance of textures and flavors. The crispness of the buttery puff pastry, the vibrant burst of fresh strawberries, and the smooth, ethereal cream come together in a symphony that dances on your palate. It’s the kind of dessert that makes you close your eyes and savor every single bite, a true indulgence that feels both elegant and wonderfully comforting.
Why We Love It
People are drawn to the Strawberry Cream Danish for its inherent elegance and irresistible taste. It’s a classic for a reason! The bright, slightly tart flavor of the strawberries cuts beautifully through the richness of the cream and the buttery pastry, creating a harmonious and addictive combination. Whether enjoyed with a morning coffee or as a sophisticated afternoon pick-me-up, this pastry consistently delivers joy. It’s a celebration of simple, high-quality ingredients elevated to something truly special, making it a perennial favorite for bakers and eaters alike.

Ingredients:
- 1/4 cup warm water
- 2 1/4 teaspoons (1 packet) active dry yeast
- 1/2 cup milk, at room temperature
- 1 large egg, at room temperature
- 1/4 cup granulated sugar
- 1 teaspoon salt
- 2 1/2 cups all-purpose flour, plus more for dusting
- 1 cup (2 sticks) unsalted butter, cold and cut into cubes
- 8 ounces cream cheese, softened
- 1/4 cup granulated sugar
- 1/2 teaspoon vanilla extract
- Fresh strawberries, sliced for topping
- 1 cup powdered sugar
- 2 tablespoons milk or water
- 1/2 teaspoon vanilla extract
Making the Danish Dough
Step 1: Activating the Yeast and Mixing the Dough
Let’s begin extract by waking up our yeast. In a small bowl, combine the 1/4 cup of warm water and the 2 1/4 teaspoons of active dry yeast. Give it a gentle stir and let it sit for about 5 to 10 minutes. You should see it become foamy and bubbly – that’s a good sign the yeast is alive and ready to work its magic! While that’s happening, in a large mixing bowl, whisk together the 1/2 cup of room-temperature milk, the large egg, and the 1/4 cup of granulated sugar. Add the teaspoon of salt and whisk again until everything is well combined. Once your yeast mixture is foamy, pour it into the milk and egg mixture. Gradually add the 2 1/2 cups of all-purpose flour, mixing until a shaggy dough forms. It might seem a little sticky at this stage, and that’s perfectly normal.
Step 2: Developing the Dough and Incorporating Butter
Turn the dough out onto a lightly floured surface. Now, we’re going to knead it. Gently push, pull, and fold the dough for about 8 to 10 minutes. The goal is to develop the gluten, which will give our danishes that wonderful flaky texture. You’ll know you’re done when the dough is smooth and elastic, and it springs back when you gently poke it. Now for the buttery goodness that makes danishes so special. Pat the cold, cubed butter into a rough rectangle, about 6×8 inches, on a piece of parchment paper. Dust your dough lightly with flour and gently roll it out into a rectangle that is roughly twice the size of your butter rectangle. Carefully place the butter rectangle onto the center of your dough. Fold the edges of the dough up and over the butter, sealing it completely. This is called “encasing” the butter.
Step 3: The Lamination Process – Creating Layers
This is where the magic of lamination happens, giving us those beautiful, delicate layers. Lightly flour your work surface and the top of your dough-butter package. Gently roll out the dough into a long rectangle, about 12×18 inches. Be patient and work carefully to avoid tearing the dough or squeezing out the butgin extract. Imagine you’re gently coaxing it to stretch. Now, fold this long rectangle into thirds, like you’re folding a letter. Make sure the edges align as neatly as possible. This completes your first “turn.” Wrap the dough tightly in plastic wrap and refrigerate for at least 30 minutes. This chilling period is crucial; it allows the gluten to relax and the butter to firm up, preventing it from melting into the dough. We’ll repeat this rolling, folding, and chilling process two more times, for a total of three turns. After each turn, remember to refrigerate the dough for at least 30 minutes.
Preparing the Cream Cheese Filling and Assembly
Step 4: Crafting the Creamy Filling
While our dough is chilling, let’s prepare the luscious cream cheese filling. In a medium bowl, combine the 8 ounces of softened cream cheese with the 1/4 cup of granulated sugar and the 1/2 teaspoon of vanilla extract. Using an electric mixer or a sturdy whisk, beat these ingredients together until the mixture is smooth, creamy, and free of any lumps. You want a wonderfully smooth consistency that will spread easily and taste divine. Taste it and adjust sweetness if you prefer, though this is usually just right for a balanced flavor. Set this aside.
Step 5: Shaping and Filling the Danishes
Once your dough has completed its final chilling period, turn it out onto a lightly floured surface. Roll it out into a large rectangle, approximately 12×16 inches. Using a sharp knife or a pizza cutter, trim the edges to create a neat rectangle. Now, we’ll shape them. You can cut this large rectangle into smaller squares, about 4×4 inches each, or you can cut it into a grid of smaller rectangles for a more traditional danish look. For each danish, spread a generous tablespoon or two of the cream cheese filling onto the center of your dough shape, leaving a small border around the edges. Arrange your sliced fresh strawberries on top of the cream cheese filling. You can be as artistic as you like with the strawberry placement.
Step 6: Baking and Glazing for the Perfect Finish
Preheat your oven to 375°F (190°C). Carefully transfer your shaped and filled danishes to a baking sheet lined with parchment paper. You might want to gently fold in the corners of each danish, creating a slightly more enclosed shape around the filling, or leave them open. Bake for 18 to 22 minutes, or until the danishes are golden brown and puffed up beautifully. Keep an eye on them, as ovens can vary. While they’re baking, let’s whip up a simple glaze. In a small bowl, whisk together the 1 cup of powdered sugar, the 2 tablespoons of milk or water, and the remaining 1/2 teaspoon of vanilla extract. Add more liquid a tiny bit at a time if you want a thinner glaze, or more powdered sugar if you prefer it thicker. Once the danishes are out of the oven and have cooled slightly on the baking sheet, drizzle the glaze generously over the warm treats. The warmth will help the glaze spread and set into a lovely, sweet finish. Allow them to cool completely before serving for the best texture. Enjoy your homemade Strawberry Cream Danish!
Conclusion:
There you have it! Our delightful Strawberry Cream Danish recipe is ready to grace your breakfast table or afternoon tea. This recipe strikes a perfect balance between the flaky, buttery layers of puff pastry and the sweet, tangy burst of fresh strawberries, all complemented by a luscious cream cheese filling. It’s a truly impressive yet surprisingly achievable treat that is sure to impress your family and friends. We encourage you to give it a try and savor every bite!
For serving, these danishes are wonderful on their own, but they also pair beautifully with a cup of coffee or a glass of iced tea. Consider dusting them with a little powdered sugar for an extra touch of elegance. Don’t be afraid to experiment with variations – perhaps a swirl of raspberry jam in the cream, or a sprinkle of toasted almonds on top for added texture. The possibilities are endless, and the joy of creating these delicious treats is all yours.
Frequently Asked Questions:
Can I make the Strawberry Cream Danish ahead of time?
While the filling can be made a day in advance and stored in the refrigerator, it’s best to assemble and bake the danishes closer to serving time to ensure the puff pastry remains perfectly crisp and flaky. You can prepare the strawberry topping ahead as well.
What kind of strawberries work best for this recipe?
Fresh, ripe strawberries are ideal for the best flavor and texture. If fresh strawberries are out of season, you can use thawed frozen strawberries, but be sure to drain them very well to avoid making the filling too watery.
Easy Strawberry Cream Danish Recipe
A simple recipe for delicious homemade strawberry cream danishes featuring flaky pastry and a rich cream cheese filling.
Ingredients
-
1/4 cup warm water
-
2 1/4 teaspoons active dry yeast
-
1/2 cup milk, at room temperature
-
1 large egg, at room temperature
-
1/4 cup granulated sugar
-
1 teaspoon salt
-
2 1/2 cups all-purpose flour, plus more for dusting
-
1 cup unsalted butter, cold and cut into cubes
-
8 ounces cream cheese, softened
-
1/4 cup granulated sugar
-
1/2 teaspoon vanilla extract
-
Fresh strawberries, sliced for topping
-
1 cup powdered sugar
-
2 tablespoons milk or water
-
1/2 teaspoon vanilla extract
Instructions
-
Step 1
Activate yeast in warm water. Whisk together milk, egg, sugar, and salt in a large bowl. Add foamy yeast mixture and gradually incorporate flour until a shaggy dough forms. -
Step 2
Knead dough on a floured surface for 8-10 minutes until smooth and elastic. Pat cold butter into a rectangle on parchment paper. Roll out dough to twice the butter’s size, center the butter, and fold dough edges over to encase it. -
Step 3
Laminate the dough: roll out into a long rectangle, fold into thirds (like a letter), wrap tightly, and refrigerate for at least 30 minutes. Repeat this rolling, folding, and chilling process two more times for a total of three turns. -
Step 4
Prepare the filling: beat softened cream cheese with sugar and vanilla extract until smooth and creamy. -
Step 5
Shape and fill danishes: roll out chilled dough into a rectangle, cut into desired shapes. Spread cream cheese filling onto the dough, leaving a border, and top with sliced strawberries. -
Step 6
Bake at 375°F (190°C) for 18-22 minutes until golden brown. While baking, prepare glaze by whisking powdered sugar, milk/water, and vanilla extract. Drizzle glaze over slightly cooled danishes.
Important Information
Nutrition Facts (Per Serving)
It is important to consider this information as approximate and not to use it as definitive health advice.
Allergy Information
Please check ingredients for potential allergens and consult a health professional if in doubt.